
By Mike Grage, Technical and Customer Support at The Bonneville Shop and British Iron.
Table of Contents

So, you bought a TBS-0002 Classic Tri-Spark Triples Ignition kit and you’re having a tough time wiring it up and/or setting the timing. Well don’t worry, I got your back. This ignition system is a little different, but in a good way. This is the Tri-Spark triples ignition system I will use if I build another vintage triple for maximum street performance.
I will not get into the specifics of how I would use this ignition system to do that because I don’t want to be blamed for someone blowing holes in their pistons, and it has a “don’t try this at home” level of technical difficulty. I’m sure Steve Kelly, and a few others know what I’m talking about.
“The way this ignition system works is functionally different from the Boyer Brandsen electronic or points ignition systems.”
The way the Tri-Spark triples ignition system works is functionally different from the Boyer Brandsen electronic or points ignition systems. Those two ignition systems can be used with 4-volt or 6-volt coils wired in series and will have a dead spark firing method. In other words, all three spark plugs firing at the same time.
The Tri-Spark triples ignition is best described as a “distributed transistorized pointless ignition” system since it fires one spark plug at a time. Since the TBS-0002 distributes the spark, the transistor does less work which results in better signal amplification, and the coils are doing 1/3rd the work which gives them more time to build up their magnetic fields. This results in more energy at the spark plug electrodes.
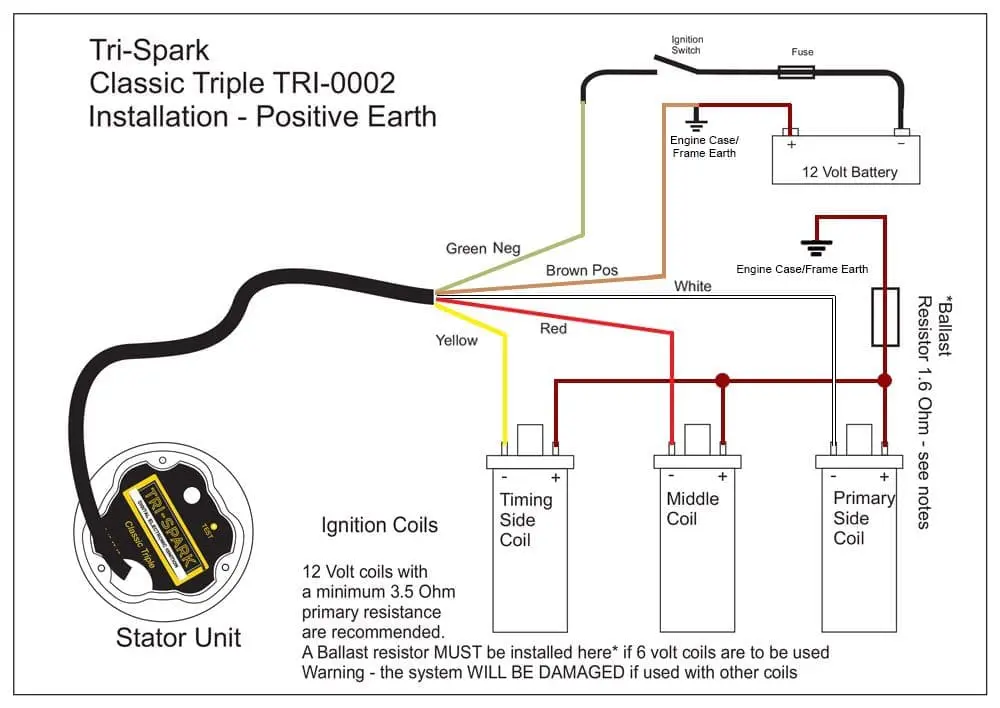
How to Wire it Up
One common mistake is attempting to wire up the Tri-Spark triples ignition in the manner required for points with 6-volt or 4-volt coils in series, aka-the dead spark configuration. The reason this does not work with the TBS-0002 is because the internal components require a power flow from positive to negative through the coils and stator plate unit.
So, on a positive ground/earth machine it is necessary to ground the positive terminals of the 12V coils to the engine cases, and on a negative ground/earth machine the coils cannot be grounded at all. The Tri-Spark triples ignition instructions also have instructions on how to use 6V coils and a 1.6 ohm ballast resistor with this ignition system, and I discourage using 6V coils with this system because ballast resistors are not dependable when used in any vehicle with a single phase charging system.
“…on a positive ground/earth machine it is necessary to ground the positive terminals of the 12V coils to the engine cases, and on a negative ground/earth machine the coils cannot be grounded at all.”
Here is the advice I give when a customer has trouble wiring one up to work with Positive Ground/Earth. Run the Tri-Spark brown wire and wires from the positive (+) terminals on the 12V coils to a solid ground/earth connection, preferably a motor mount. Connect the yellow wire to the timing side coil’s negative (-) terminal, red wire to the middle coil’s negative (-) terminal, and white wire to the primary side coil’s negative (-) terminal. Then connect the green wire to the white or white/yellow wire that was connected to the negative terminals on the coils, that is the wire coming from the handlebar kill switch (or ignition switch for the less safety conscious).
I took the liberty of redoing the wiring diagrams Tri-Spark provides in an effort to simplify it for the end user. In the diagram below we use black for the wire for the ignition switch/handlebar kill switch because wire colors can vary due to various repairs by shops and owners over the decades.
For Negative Ground/Earth the coils cannot be grounded at all, and the positive (+) terminals on the 12V coils and the brown wire should be wired into the handlebar kill switch (or ignition switch). The green wire is the only wire that should have a solid ground/earth connection. And the yellow, white, and red wire connections are the same as for a positive ground/earth bike.

In the diagram below the colors of the power and ground wires are not factory, and I chose to use the universally known red for positive and black for negative.
Setting the Timing
Using a timing light/strobe to set the advanced timing is the most important part of the installation/tuning process. Tri-Spark provides excellent instructions for setting the timing, both statically and dynamically. Of course, there is one variable that can make setting the initial/static timing a little difficult, the resistance of the primary winding circuit for the ignition coils. The higher the resistance the later the spark. So, if the 12V coils and wires in use are over 3.5 ohms the static timing will need to be slightly advanced, and if it is less than 3.5 ohms the static timing will need to be slightly retarded. The previous sentence also applies to 6V coils and ballast resistors.
I hope this Tri-Spark triples ignition guide helps simplify the installation process for the laymen. Let us know if we can clarify this guide in any way, we do our best to provide the best technical support possible.
Mike