Dave Porter, Technical and Customer Support at The Bonneville Shop.
Motorcycle Wheel Building
One of the more satisfying elements of the restoration of a vintage motorcycle is the refurbishment of the spoked wheels. From rusted, bent, and unsafe rims to dull corroded spokes and nipples, the transformation to bright and shiny rims and spokes makes a visual statement that is almost unrivaled in the overall appearance of a roadworthy and restored motorcycle.
This blog is not intended to be a comprehensive instructional article in moto, but rather a general overview of getting the process underway and working towards final success. A specific skill set is required to rebuild spoked wheels from start to finish, but the initial teardown of the original wheel and relacing a new rim and spokes is well within the abilities of many vintage British motorcycle owners. I’ll be offering up a few suggestions here to get the process underway.
Once the wheel is removed, an assessment can be made whether or not the original rim needs to be replaced. Often times, light surface rust can be removed to reveal the luster of the original chrome plating. Fine steel wool used with WD40 can be effective for scrubbing off the rust and it’s worth the time to try this before disassembling the wheel to see if the finish will meet your expectations.
If a truing stand is available, you can place the wheel in the stand and spin it slowly to check for any damage in the integrity of the rim. Spinning the axle by hand can also help determine if the wheel bearings are worn out, requiring replacement. If this is the case, it is often easier to remove and replace the old bearings prior to disassembly of the wheel.
Taking Photos and Noting The Pattern
Before any disassembly commences, it is strongly advised to take a number of pictures, including some with the wheel still fitted in the fork or swinging arm. This will allow you to view the offset required to properly center the wheel and pre-empt any potential alignment issues after the wheel is completed. Photos of the spoke pattern from both sides of the hub and rim will also be helpful for reference when re-spoking the wheel.
At this time, you can compare the new replacement spokes for overall length against the originals. Find the valve stem and observe the spokes on either side of it to see how they are laced from each side of the hub. This is generally the starting point for reassembling the wheel after the preliminary steps of rim inspection, bearings evaluation, and confirmation of the correct spoke lengths. You really won’t be able to accurately view the bends on the ends of the spokes until the wheel is disassembled, so at this point you are ready to teardown the wheel for relacing with new spokes.
Look at the pattern carefully and notice how and where the spokes cross each other on each side of the hub and rim. Inspect the angles of the drillings of each nipple bed, or “dimple”. You will notice they are pierced at the same angle every four dimples on a 40-spoke rim. Once you are familiar with the established pattern, you can commence with disassembly.
Disassembly
I have always been in the habit of loosening up each spoke on both sides of the hub incrementally, so that almost all of the threads are showing on the ends of the spokes where the nipples are threaded on. Using a paint pen, make a mark on the left side of the wheel hub corresponding with the spoke that is fitted to the rim next to the valve stem on the left side of the rim. Repeat this step for the right side of the hub and rim.
We are trying to preserve the original orientation of the spokes in the hub, so that any wear marks at the spoke holes on the hub won’t be exposed when relacing the wheel. Once all of the spoke nipples are loose, you can start removing them one by one until the rim is liberated from the hub.
Reassembly
Now, the real fun in motorcycle wheel building begins. Assuming the hub and brake drum has been cleaned or refinished and bearings replaced; you are ready to start the reassembly. Separate all of the spokes out into like groups, considering overall length and bends. There may be as many as four groups of (10) spokes with variances in length and bend angles, although in most cases, there will be only two lengths.
Check the fitment of the spoke nipples into the pierced holes in the rim, the nipples should turn freely in the holes. If they are tight, use a rat tail file to deburr the piercings, if necessary. Thread the nipples onto the spokes partially to ensure they readily thread on. Depending on the hub and brake drum type, there may be “nailhead” spokes on one or both sides of the hub, where there is no bend.
This is a good time to test fit the nailhead spokes in the hub by inserting the spoke from inside of the brake drum through the angled drillings on each side. Usually, these spokes are a slightly tighter fit through the holes, but they should still spin with a slight resistance. Once the components have been verified for compatibility, you are ready to start lacing the wheel.
Since the hub/brake drum has been previously marked, this is where the lacing begins- at the valve stem hole on the rim. Find the marked hole on the hub and place the spoke in the hole, then find the corresponding hole in the rim and thread the nipple onto the end of the spoke after applying a drop of spoke prep to the threads. You will only need to have the nipple threaded on a couple of turns, so that most of the threads on the spoke will show. It’s important that during the initial lacing of the spokes, they are all showing approximately the same number of threads on the spokes.
Next, skip a hole on the hub (or brake drum flange) and place the next spoke in the hole and then skip three holes on the rim and fit the nipple to the spoke on the fourth hole, again…loosely. Following this pattern, and using your pictures as your guide, proceed all the way around the rim until all 20 spokes are in place.
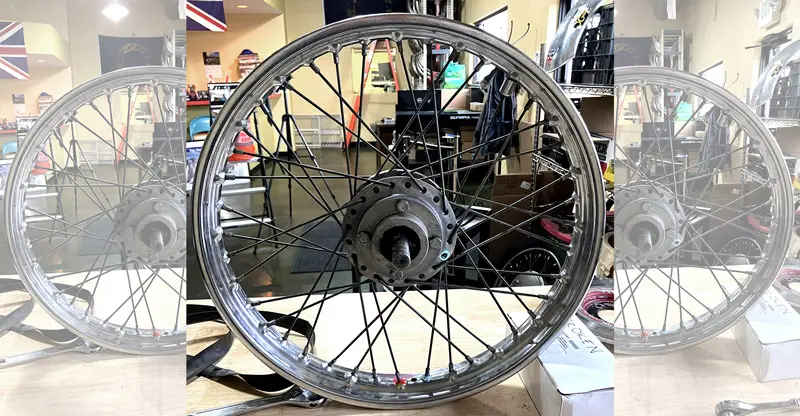
Now, flip the wheel around and repeat the same process until you have installed all 40 spokes. Gradually tension each spoke until you have around 1-2 threads showing. In most cases, the wheel will be somewhat true when the spokes have all been tightened approximately the same amount.
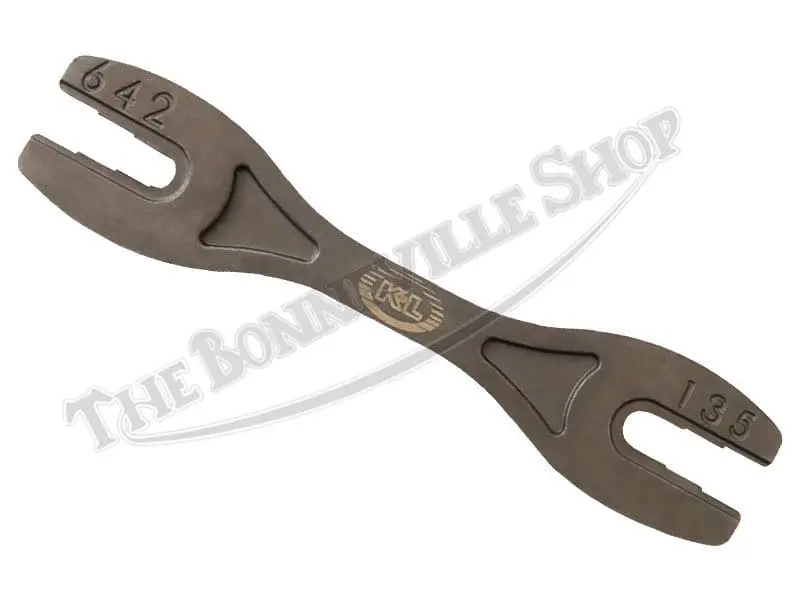
The wheel is now ready for the truing process, which is often times a job for an experienced wheelsmith, as it involves adequate tension, lateral trueness, and no ovality when spinning the wheel. This is a very specialized skillset that even the most experienced mechanics struggle with. Having access to specialized tools such as a spoke wrench and wheel truing stand is necessary to safely and professionally complete the final steps in the process.
The purpose of this blog is to get you started in lacing the wheel and leaving it up to a specialist to finish off the truing process, paying attention to adequate spoke tension, correct offset, and a perfectly trued wheel. Hopefully, this has been helpful in getting the project underway.